- Digital CreAItives
- Posts
- Streamline Your Content Creation Process:
Streamline Your Content Creation Process:
5 Essential Tools You Need to Know

Justin Nelson
June 02, 2024

Hello Digital CreAItive,
This week we are going to dive into some of the different tools that I use for creating content on LinkedIn.
I hope that by the end of this newsletter, you’ll adopt some of these tools and processes to help make your life a little easier.
To be fully transparent: my process involves a hybrid approach of both human + AI content.
I know some people are against it but this is just what works for me.
Before we dive in:
⚒️ Reply to this email with your favorite tool for creating content.
Some of these may actually surprise you but I know you’ll still find the information valuable.
Here are the main 5 tools I use + my workflow:
1. Notes
2. ChatGPT
3. Docs
4. Canva
5. BONUS
Let’s dive into each of these tools and how I use them in my workflow.
1. Notes 💡
All of my posts start here.
My humble, little, generic Notes app on my phone.
I keep a running list of ideas on my phone for both my LinkedIn posts and my newsletters.

screenshot
This allows me to quickly get my idea down without forgetting it and get back to whatever I was doing.
I understand that some people may prefer to physically write their ideas down and that works just as well!
Do whatever works best for you.
The idea is just to get it out of your head and written down so you don’t forget it!
If you don't already do this, I highly recommend starting.
This way if your creative juices aren’t flowing, you have a long list to pull from.
2. ChatGPT + Perplexity 🤖
Next, once I have my idea selected, I then hop into ChatGPT (you can use whatever AI tool you prefer).
I like to use ChatGPT because I have several custom GPTs built out that save me a ton of time.
By using my own GPT it gives me an output that:
- Writes in my tone
- Uses my format
- Is 75% done
If this isn’t something you currently do - this is your sign to start.
If you have a ChatGPT subscription, you can easily create your own by doing the following.
Start by taking your Top Performing posts, saving them as a PDF then uploading them to your custom GPT.
Next, give it instructions on how you want your posts to be formatted.
Bada-bing bada-boom!
Just like that, you have your custom GPT that’s going to save you hours.
This next step is optional.
Depending on the response I get, I may hop over to Perplexity to do some additional research and see if there’s anything else I should include in my post.
3. Google Docs ✍️
Now that I have a basic framework from ChatGPT and Perplexity it’s time to bring in the human element and personalization.
This is where Google Docs comes in.
I use Docs because:
It’s free
It has a ‘pageless’ feature
(it looks clean & helps keep me focused - see below)

regular

pageless
Once I have copied and pasted everything into Docs I start editing.
Again, most of the time the post is 75% of the way there, and at this point, I’m just making final adjustments.
Make sure you edit for your own tone and writing style so you can add a personal touch.
4. Canva 🖌️
Now this is when the fun begins (at least for me because I love designing).
If you don’t know what Canva is, it’s basically Photoshop but much more user-friendly and completely free.
This is where I spend the majority of the time on my posts, especially for carousels.
For reference, a LinkedIn ‘carousel’ is a post that you swipe through.
This is where the term ‘carousel’ comes from.
They are typically a guide of sorts on how to do something.
But, it can be on any topic - see an example of one of mine below.
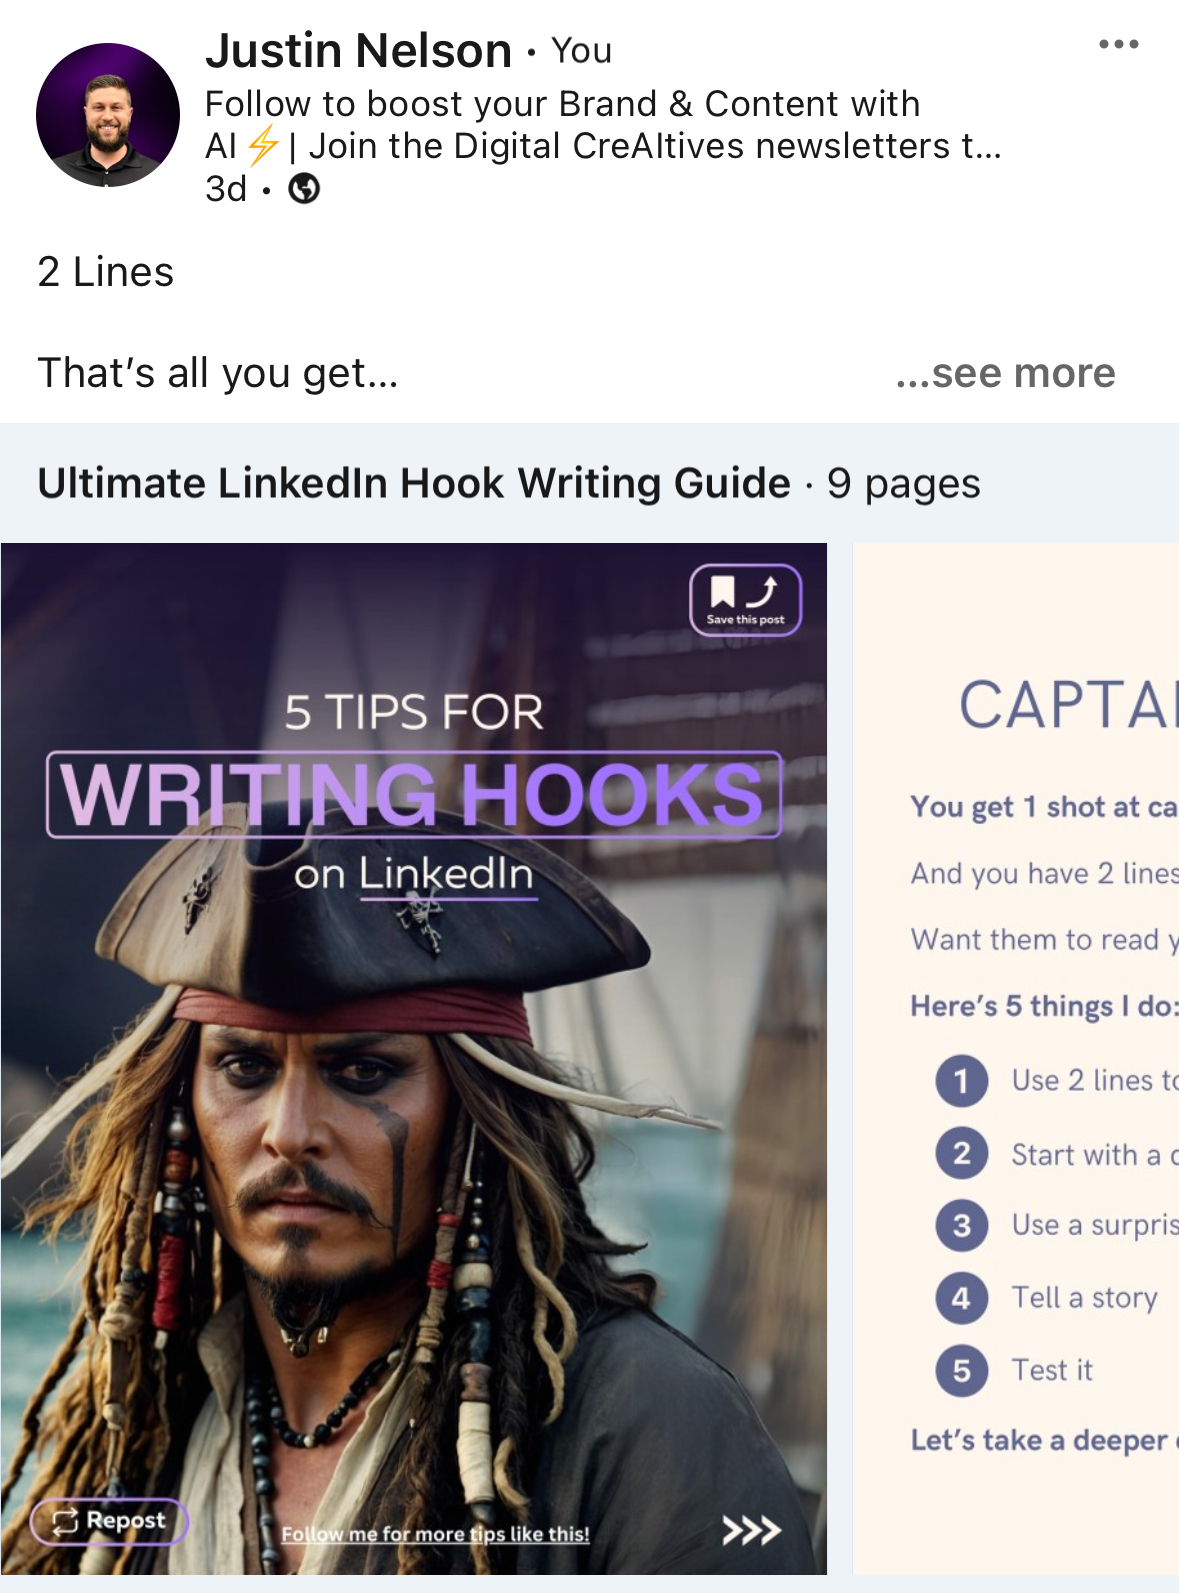
I used AI to create Jack Sparrow
If you aren’t already connected with me on LinkedIn, tap this and go give me a follow.
Canva is great for creating any kind of graphic or visual for your post.
I highly recommend using it as visuals grab a reader's attention vs plain text.
5. BONUS: Kleo 📱
This is the final step and one that people don’t know about and don’t do.
Lucky for you - I’m about to show you.
This is probably one of the biggest hacks for LinkedIn.
Like we discussed last week, the importance of proper formatting on a post cannot be stressed enough.
If you missed last week’s newsletter, stop and read it now before continuing.
Before making your post you need to see what it’s going to look like to everyone else.
This is where Kleo comes in.
This is a completely free Chrome extension and is a MUST-have in your toolkit.
This tool allows you to see what it will look like on a phone, tablet and desktop before posting.
And no, this isn’t an ad.
I just strongly believe everyone’s post could improve if they saw what it looked like ahead of time.
Here’s an example of what it looks like.
The three arrows allow you to see what your post will look like on each device.

Remember, always test your post before you click ‘post.’
Wrap Up 🏁
I hope you gained some valuable insight and practical tips on how you can up your LinkedIn content from this newsletter.
Remember if you ever need any help or guidance with your LinkedIn, I’m here to help you:
I look forward to seeing you back here next Sunday!
Have a great week!

Justin | LinkedIn Coach